Get 15% off your first online order when you subscribe to email.Terms & conditions apply.
888.354.7868Monday - Friday, 8am - 5pm CT

Remember the 10-foot rule.
You don’t need to be a designer to set up variable data printing of your badges. In fact, combining artwork with words is really the fun part.
Beginning with the 10-foot Rule, follow these best practices below to create badges that are strong, clear, and memorable. Since first names or nicknames are best for networking, make sure you can see them from up to 10 feet away with a large, clear type — anything between a 26 to 40 point size.
A. Most Important Info: First name or Nickname
26-40 point
B. Secondary Info: Full Name or Last Name
20-24 point
C. Tertiary Info: Company name, title or location
19-20 point
Don't forget the back of the badge!
The back of the name badge is valuable real estate for information your guests will appreciate having close at hand during the event. Here are just a few of the possibilities:
• Maps or conference center layouts
• Schedules or agenda
• Sponsor messages
• Wi-Fi details
• Event hashtag
• Retail advertising/discount coupons
• Next meeting’s date and promotional message
• Inspiring quote of the day, company motto
We’re here to help.
Call us if you need assistance with your badge setup: 888.354.7868. We’re happy to lend a hand. Visit our Tag Talk Blog for more info or ideas.
Have a question on submitting art? See our Art Guidelines for more info.
Set up your variable data.
Send us your names in an Excel Document formatted with the information to print in separate columns. Please make sure your list is correct to ensure an error-free badge printing experience. Any misspellings, capitalization errors, additional spaces, etc. on your list will show up on your badges. Specify how badges are to be sorted (alphabetically by last name, by company name, etc.).
Download our sample spreadsheet and watch our short instructional video if you have questions on how to format.

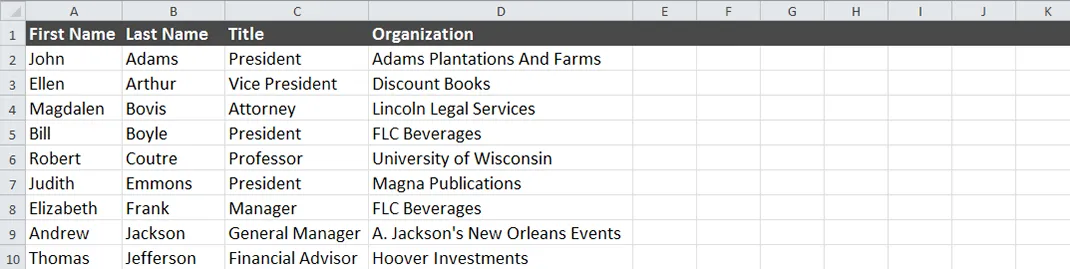
Here's a basic conference attendee list
After reading about the 10-foot Rule (above), it’s really easy to set up your attendee list info in order of importance. For your name badges to be formatted like the example on the left, title your spreadsheet columns First Name, Last Name, Title, and Organization. Then fill in the variable data.
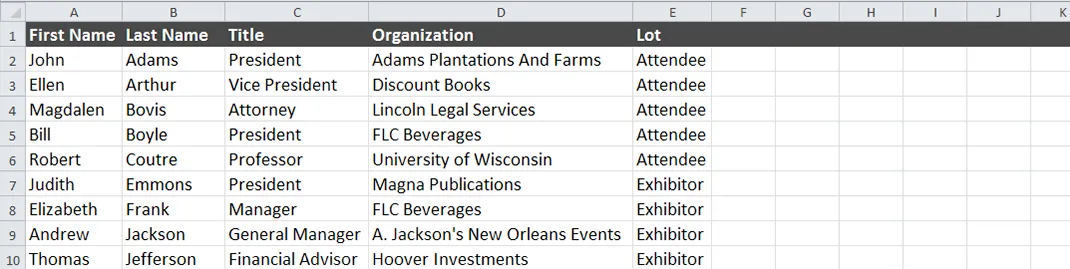
How to add "lots" or categories
If you would like to add a category that describes each participant’s role at the event, add another column titled Lot and include their role in the blank, such as Attendee, Speaker, Exhibitor, etc.
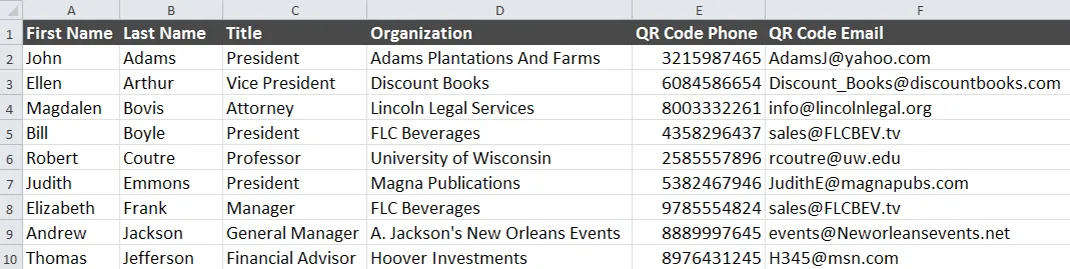
Would you like a QR code or barcode?
We can create a unique QR Code or Barcode for each attendee so that you can easily track who’s arrived and prevent a security breach. The spreadsheet below shows added columns that contain phone numbers and emails, two pieces of info that remain private unless read by a scanner or an app. So attendees have an easy way to exchange contact data simply by scanning badges with their smartphones.
Upload your variable data.
Before uploading your variable data, make sure you have the following:
A quote number.
Please call or email [email protected] if you do not already have a quote number to start your order. Or start your quote here.
Your spreadsheet and variable assets should all be submitted in a zipped file.
Please download our template spreadsheet and add your variable data. If you have any other assets to include such as images please zip everything into one folder. Artwork can be included.
Upload your file using our secure box.com file share.
Remember to add your quote number to the description field, and you’re all set!